
Speed matters when you are moving from joint to joint, rushed prep or loose tooling can leave more work behind. The right caulking tools give you more control at the points that usually slow the job: old sealant, cartridge setup, and the finished bead. In this guide, you’ll see where a dedicated tool belongs in the workflow and where product directions should lead your technique.
On a professional caulking job, a tool earns its place by taking guesswork out of a repeat motion. A cleaner edge in the corner or a controlled nozzle cut can keep the job from turning into extra passes with a blade.
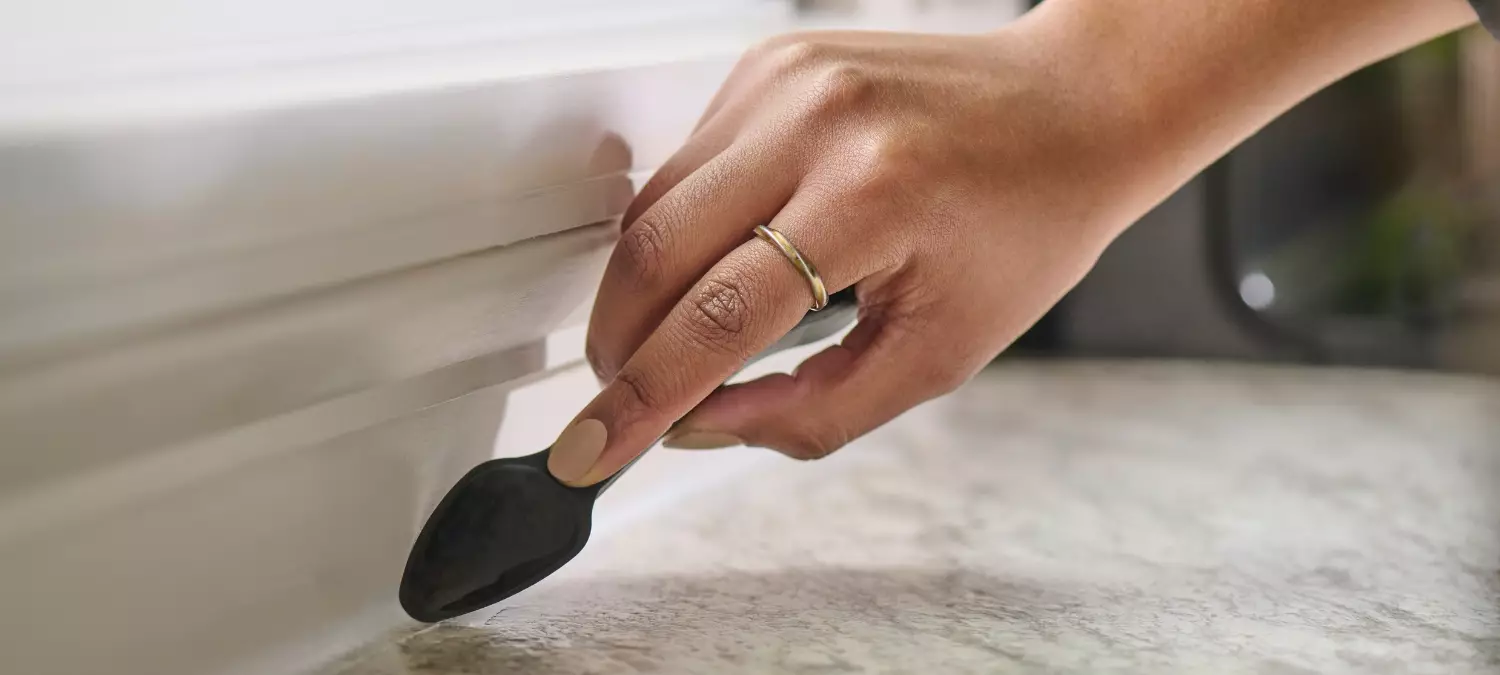
Use a caulk removal tool where old sealant slows the job
John Degirolamo, Sr. Consumer Technology Insights Manager, puts the GE Sealants application point plainly: “Recaulking is the tricky part because you really need to get all the old sealant out.”
His point shows up in the corner. You can pull the visible bead free and still leave cured material packed where the two surfaces meet.
When that material stays in the joint, a caulk removal tool can help you lift and scrape with control. GE’s Sealant Remover Tool gives you a pointed end for getting under cured material in the corner.

Once you loosen the bulk, switch to the tool’s flat edge and scrape residue along the joint line. That sequence gives you a cleaner surface before you apply new sealant.
If a thin layer looks easy to cover and move on, remove it. Applying silicone sealant over old sealant leaves the new bead sitting on old material instead of a clean surface.
After removal, clean the joint as directed on the sealant label. Use isopropyl alcohol only when the sealant label approves it for surface prep, then let the joint dry before you apply new sealant.
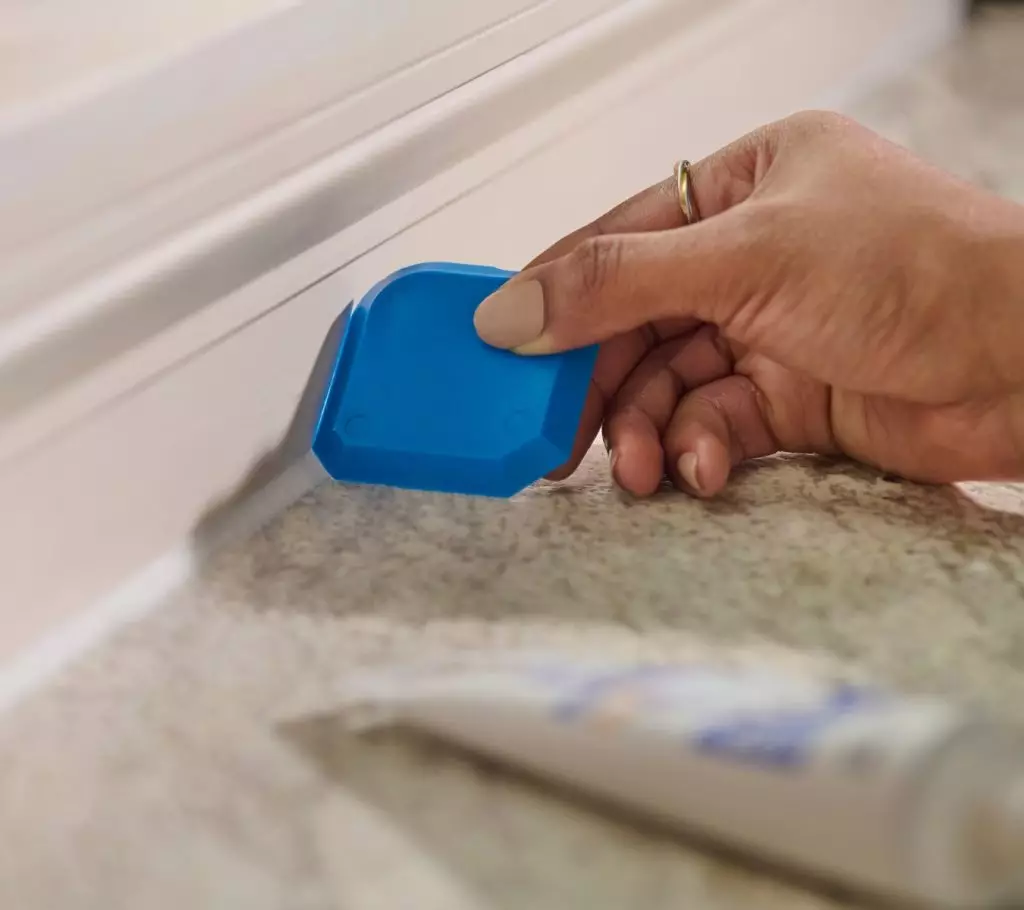
Cut the cartridge tip for the bead you need
Once the joint is ready, the cut you make at the cartridge tip starts setting the size of the bead.
Cut too wide, and you can load the joint with more sealant than the bead needs. Make a rough cut, and you can start with a less predictable opening.
For setup, one of the contractor tools worth keeping close is GE’s Cartridge Opener and Smoothing Tool. You can use the cutter to open the tip to match the joint instead of using a blade.
The tool gives you a cleaner cut and a steadier opening, so you can start with a bead that needs less correction after you apply it.
Use a sealant smoothing tool to control the finished profile
After you apply the bead, choose the profile you want the joint to hold.
Pull the edge that matches the gap with steady pressure. As the tool moves, the edge shapes the sealant and collects excess material instead of smearing it across the surface.
GE’s Sealant Smoothing Tool gives you multiple profile edges for that pass.
On a tub or shower joint, the finished line gets seen up close, so a repeatable profile matters.
Around a toilet base, the controlled edge can help keep the bead from widening as the surface changes direction. In a three-way corner, slow down and keep the profile seated only where the tool can stay flat against the joint.
If the bead needs another pass, wipe the edge of the sealant smoothing tool first and work while the sealant is still workable. Stop once the profile is clean, so you are not pulling excess material back across finished work.
Match tooling pressure to the joint and sealant
As you tool the bead with the Sealant Smoothing Tool, use enough pressure to bring the sealant against both sides of the joint without thinning the bead.
For a wider gap, pull slower and keep firmer contact. In a tight inside corner, use a lighter touch so you do not flatten the bead or pull material away from the joint.
The goal is controlled side contact, not force.
A properly tooled bead can help improve contact with the sides of the joint.
Tooling pressure helps only after you prep the surface and choose the right sealant for the joint.
Silicone sealants cure. Acrylic caulks dry. That cure-or-dry behavior can affect how the bead holds its shape after tooling, so stay within the product’s tooling time and label directions.
Keep cleaners and lubricants out of the bead
When the Sealant Smoothing Tool edge starts to drag, stop and wipe excess sealant from the edge with a dry cloth before your next pass. Do not wet the bead to make the tool slide.
Keep soapy water, oils, spray lubricants, and cleaners out of the sealant while you tool it. Those materials can get into or behind the bead while you work, even when the finished line looks clean. Keep the pass on the tool edge, not a wet finger.
Use isopropyl alcohol only for approved surface prep, not for smoothing the bead. Before you put anything on the bead to make tooling easier, check the sealant and tool package directions.
A caulking tool earns its spot when it solves the step that is slowing the work. Choose the tool for the condition in front of you, then let the sealant label set the limits.
Find GE Sealants and tools near you for your next job at a retailer near you in the U.S. or Canada.


