A bathroom is often home to moisture buildup, mold, and mildew, but it doesn’t have to be. Taking precautions to properly seal cracks, crevices, and areas prone to moisture exposure will fight mold while extending the life of your bathroom.
Explore the best bathroom sealant and tips for using it like a professional.
Note: This DIY article is provided as a general guide only and is not intended to replace product-specific installation procedures; always follow applicable manufacturers’ instructions. Depending on your home’s age and condition, location within the home, and other potential factors, repairs and/or upgrades or other services may be necessary prior to the beginning and/or completion of your project that may involve the services of a home improvement professional. This article does not include advice pertaining to local building codes and/or any related inspections.
What parts of a bathroom do you need to seal?
According to the International Residential Code, licensed contractors are required to keep areas airtight anywhere fixtures come in contact with walls or floors. You will want to double-check your specific area for additional codes and laws to seal a bathroom correctly.
Here’s a list of what you should seal around a bathroom, both according to code and best practices:
- Seal around the bathtub or shower base where it meets the floor and where it meets the wall.
- Seal around the base of the toilet where it meets the floor and where it meets the wall.
- Seal around any sinks where it meets the floor and wall.
- Seal around any piping that comes from the wall.
- Fill any bathroom holes with sealant.
- Seal any joints in the bathroom.

How often do you need to seal a bathroom?
The average bathroom sealant will last about five years before you will need to re-seal the bathroom. However, a high-quality sealant can last over ten years, or even the lifetime of your home, if you properly apply it and take care of it.
To help bathroom sealant last longer, be sure to clean it regularly. Secondary mold and mildew growth is possible. This occurs when soap or residue sits on top of the silicone and creates a surface for mold growth.
Seal your bathroom every five to ten years. Keeping sealant clean of soap and residue helps it last longer.
Best bathroom sealant to protect against mold and mildew
Silicone sealant is the best bathroom sealant. It’s 100% waterproof, flexible, and protects against mold and mildew.
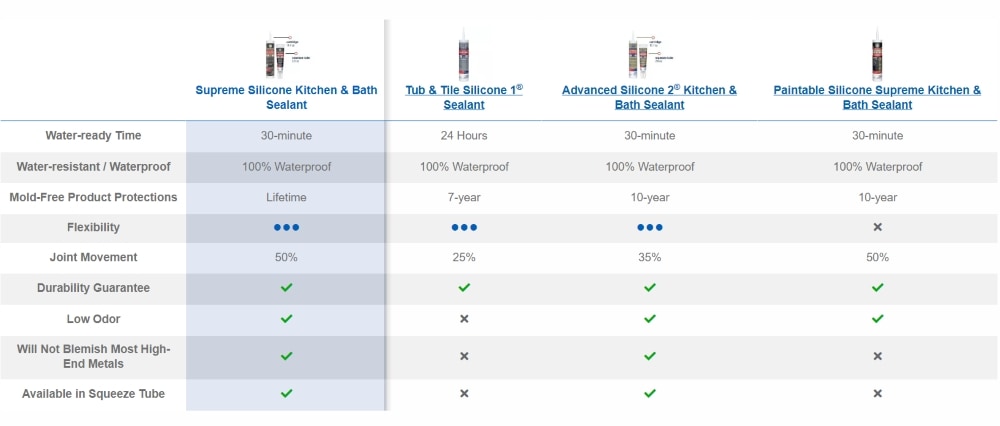
GE Sealants offers four bathroom sealants with different strengths:

8 tips to seal a bathroom like a professional
To lay sealant that will last longer and adhere stronger, follow these eight tips from the professionals.
-
Stick to the standards
There are many areas of a bathroom renovation where a contractor’s creativity can shine. Sealing is not one of those areas. There are strict codes around sealing bathrooms because of the dangers water and humidity can cause. It can risk the integrity of the bathroom, leak moisture into the walls and floors, and cause harmful mold growth.
Be sure to be thorough when sealing bathroom tubs, toilets, and sinks.
Choosing 100% waterproof silicone sealant is the only way to protect a bathroom adequately. Applying it around the toilet, bathtub, sinks, and all floor and wall fixtures is a must to meet safety standards and preserve all your hard work in a bathroom renovation.
-
Clean the area before sealing
Dirt impacts the sealant’s ability to adhere to a surface and, when trapped underneath the sealant, can cause bacteria growth despite sealing the area.
Cleaning the area includes removing old sealant and ensuring there’s no mold and dirt before applying fresh sealant.
After cleaning the area, thoroughly dry it to help the sealant cure.
-
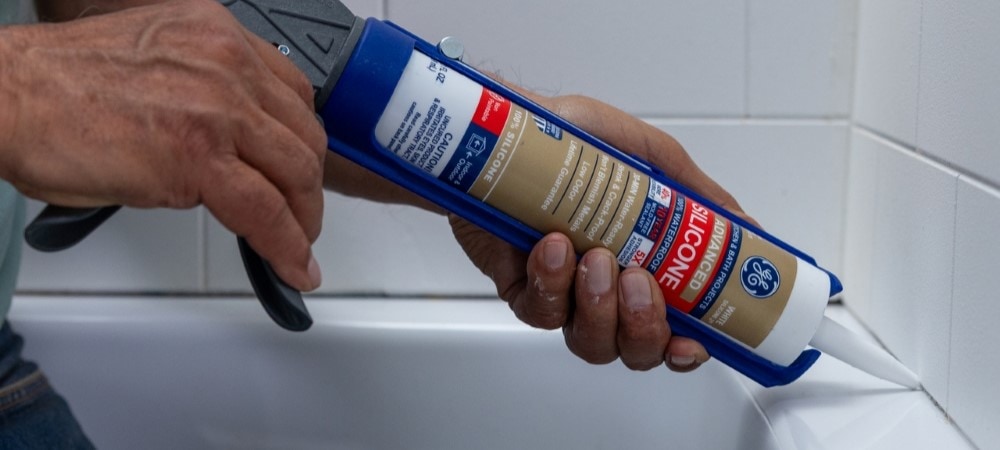
Cut a small tip on the sealant tube
To keep a bathroom looking tidy and the seal strong, you will want just enough sealant to fill a gap without it being too large of a bead.
Cutting the tip of your sealant tube slightly smaller than the gap gives you more control over your bead’s width. You will squeeze your sealant tube harder for larger gap areas, giving you a steady bead.
This avoids excess sealant that will take much longer to dry, a messy sealant job, and improper adhesion.
-
Use backer rods for deeper gaps
If a bathroom has a gap deeper than a half inch, use a backer rod before finishing with sealant. If you fill a significant gap without a backer rod, there’s a greater chance the sealant will pull away from one side of the wall. Adding the stiff foam rope behind the sealant provides a third surface for the sealant to attach to, giving it greater stability and strength.
-
Seal a line in one go
Sealant looks best when you apply an entire line at once. Whenever you stop, have air bubbles, or adjust your angle, your bead also changes in size and appearance.
Before beginning a stretch of sealant, find a comfortable position that will allow you a wide range of motion with minimal adjustments to maintain a steady bead.
-
Smooth the sealant
Smoothing bathroom sealant helps it look better and adhere to the surrounding surface.
There are bathroom sealing tools you can use to smooth out the sealant. Many professionals will also use the wet-gloved finger method. Wet a finger and run it along the sealant. Avoid soap or anything else on your glove that might impact the sealant’s integrity.
When smoothing out sealant, try to do it as soon as possible after application. You won’t want to wait until you finish the entire bathroom as it will be much harder to smooth it.
-
Let the sealant sit for 24 hours
Some silicone sealant is water-ready in as little as thirty minutes. Others are same-day water-ready, which means they can protect surfaces and crevices from water in just 12 hours.
However, silicone sealant takes a total of 24 hours to cure fully. While it might be ready to protect against water, you should avoid touching it for a full day to let it properly cure.
-
Touch-up problem areas rather than re-sealing the entire bathroom
When you have to re-seal an entire bathroom, it takes considerable time and effort. Sometimes, there might be just one or two problem areas.
Using a product like Re-New lets you touch up small areas between re-sealing. It keeps the water out while helping your current bathroom sealant job last longer.
Seal your bathrooms the right way the first time. With a high-quality, waterproof silicone sealant, you can keep bathrooms safe from bacteria and mold for longer. They are easier to apply, last longer, and hold stronger.
Find a GE Sealant in a store near you.


