

Note: This DIY article is provided as a general guide only and is not intended to take the place of product-specific installation procedures; always follow applicable manufacturers’ instructions. Depending on your home’s age and condition, location within the home, and other potential factors, repairs and/or upgrades or other services may be necessary prior to the beginning and/or completion of your project that may involve the services of a home improvement professional. This article does not include advice pertaining to local building codes and/or any related inspections.
Whether you’re sealing a bathroom, kitchen backsplash, or outdoor fixture, a clean and consistent finish makes all the difference between a DIY job and a professional result. Mastering the art of sealant application not only boosts the visual appeal of your space but also enhances durability and performance by preventing water damage, mold growth, and other costly issues. This guide will walk you through essential sealing techniques, including achieving a smooth, polished finish using the right tools and products.
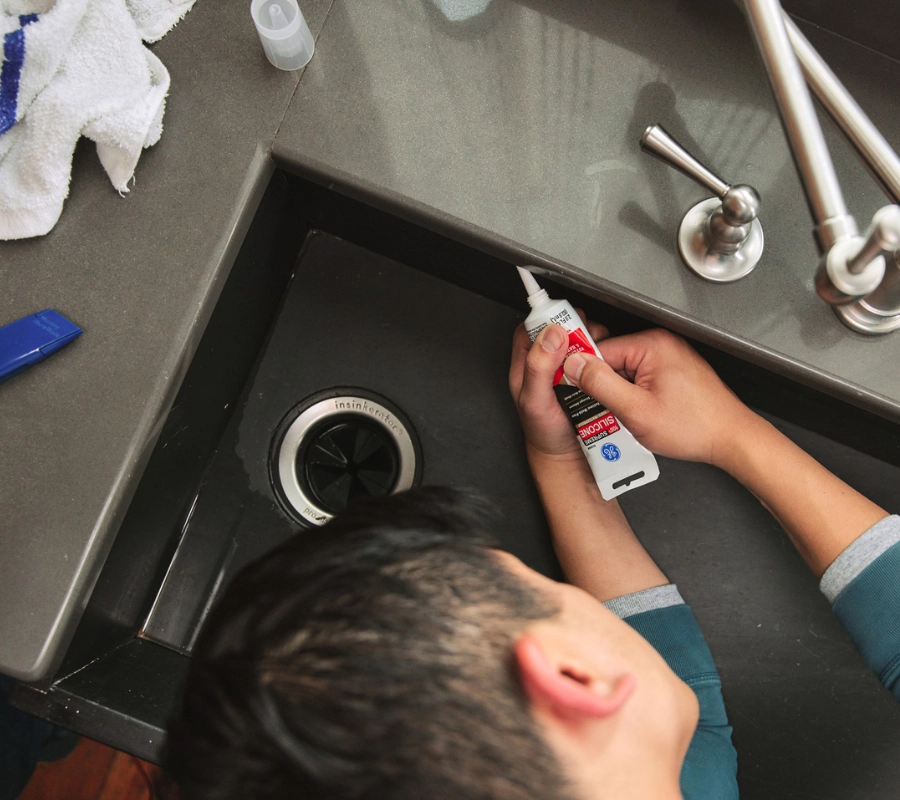
Silicone sealant is a top choice for kitchens and bathrooms because of its water-resistant properties, flexibility, and ability to adhere to a wide range of surfaces, such as tile, glass, metal, and plastic.
Why smooth sealant matters
A clean bead of sealant does more than look good. An even, continuous line of sealant ensures a waterproof and airtight bond, especially in moisture-prone areas like kitchens and bathrooms. Uneven sealant lines or gaps can compromise the seal, leading to potential water ingress, mold, and premature cracking. You can consistently achieve that flawless finish with the proper sealing techniques and tools.
How to perfect your sealant application step-by-step
If you’ve never applied silicone sealant before, it might seem like an intimidating task. However, you don’t need to call pros to take care of it. Instead, follow the steps below to seal any space with ease.
Choose the proper sealant
The first step to perfecting your sealant application is selecting the correct type of sealant for your project. Silicone sealant is a top choice for kitchens and bathrooms because of its water-resistant properties, flexibility, and ability to adhere to a wide range of surfaces, such as tile, glass, metal, and plastic.
Make sure the silicone sealant you choose is:
- Mold and mildew-resistant: Ideal for high-moisture areas like bathrooms, kitchens, and laundry rooms to prevent discoloration and surface damage over time.
- Flexible: Designed to handle movement and temperature changes without cracking, making it perfect for joints around sinks, countertops, windows, and doors.
- Surface-specific: Formulated for the material you’re working with, whether it’s glass, metal, or natural stone. Using the right product helps ensure proper adhesion and a longer-lasting seal.
- UV and weather-resistant: For outdoor projects, look for a sealant that can withstand sun exposure and temperature fluctuations without breaking down.
Prep your surface
Surface prep is essential before applying any sealant. Dirt, dust, and old sealant can interfere with adhesion and compromise the seal. Follow these steps for clean prep:
- Remove old sealant using a utility knife or caulk remover tool.
- Clean the surface thoroughly with rubbing alcohol or a surface-safe cleaner to eliminate any oils or soap scum.
- Dry the area thoroughly before applying the new sealant.
Pro tip: Use painter’s tape along the edges where you’ll apply the sealant to help guide your line and prevent smudging on surrounding surfaces.
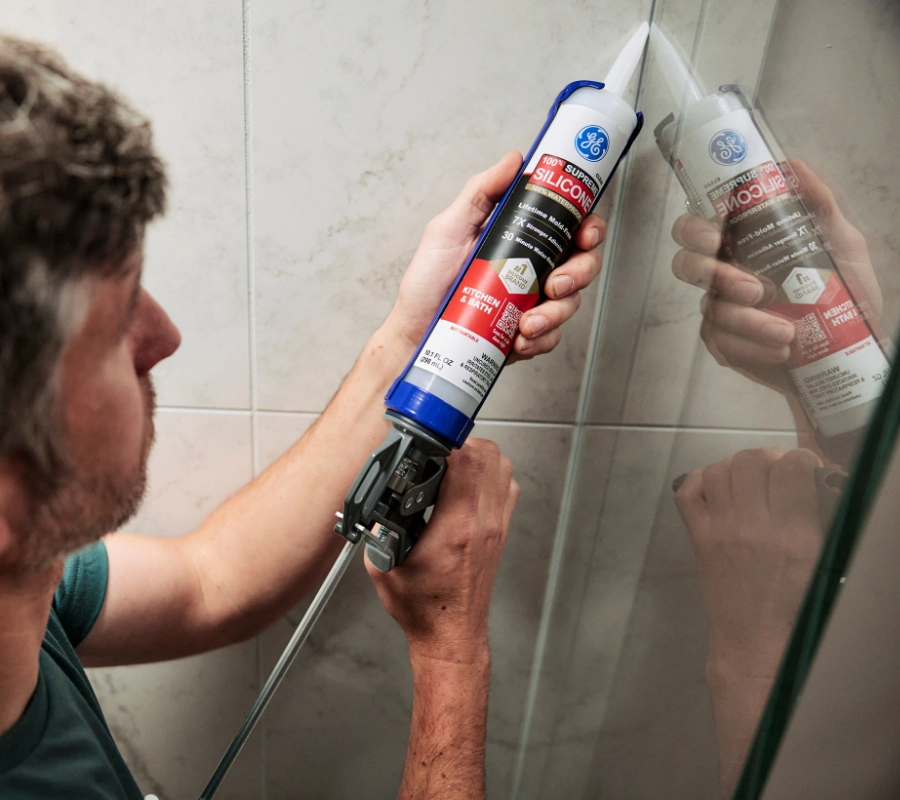
Apply a consistent bead
Now it’s time for the main event: sealant application. Before diving in, do a test run on a piece of cardboard or scrap material so you can get used to working with the sealant. Once you feel comfortable, you can move on to applying the sealant in your desired location.
Using the caulking gun, apply a smooth, even bead of sealant along the joint or edge you’re sealing. Here’s where it pays to take your time:
- Hold the gun at a 45-degree angle to the joint.
- Apply steady pressure to maintain a consistent flow.
- Avoid overapplying. A thinner, controlled bead is easier to smooth and less messy.
Once you’ve applied the bead, you can smooth it with a wet gloved finger.
Use the right tool for a flawless finish
You need a dedicated smoothing tool to get that smooth, professional finish. Our Sealant Smoothing Tool is a game-changer for sealing jobs in kitchens, bathrooms, and beyond.
This reusable tool is thoughtfully designed to work with all types of sealants, including silicone, and allows you to shape a clean, consistent seal every time.
Here’s how to use our Sealant Smoothing Tool:
- Apply a bead of sealant to the desired area. Do not overapply; you want a neat, manageable line.
- Select the desired profile on the Sealant Smoothing Tool. Multiple edge profiles let you customize the finish based on the space and project.
- Place the tool at the start of the sealant bead, with the angled surface pointing toward your direction of travel.
- Press down firmly and glide the tool along the bead uniformly. Consistency is key, so don’t stop and start.
- Remove excess sealant from the tool immediately after use with a dry cloth to keep it in top shape.
This tool not only gives your sealant a smooth, pro-level look but also saves time and reduces waste. It’s reusable and easy to clean.
Let it cure
After you’ve achieved your perfect finish, allow the sealant to fully cure before exposing it to water or moisture. Check the manufacturer’s instructions, many silicone sealants require 24 hours to cure completely.
Sealant tips for kitchens and bathrooms
Here are some additional caulking tips to keep in mind, especially for kitchens and bathrooms:
- Seal when it’s dry. Avoid sealing on humid or wet days to ensure proper curing.
- Ventilate the area. Good airflow speeds up the drying process and reduces fumes from silicone sealants.
- Keep a steady hand. If you’re nervous about wobbly lines, practice on cardboard first.
- Pull, don’t push. When applying sealant with a gun, pulling the gun gives you more control than pushing.
Don’t forget the clean-up
Even when using a smoothing tool, a little clean-up may be necessary. Keep a dry cloth or paper towel on hand to:
- Wipe away excess sealant from the smoothing tool.
- Remove smudges or overflow before the sealant cures.
- Tidy up the edges if needed (especially if you’ve used painter’s tape; remove it while the sealant is still wet for the cleanest line).
FAQs
What’s the best way to apply sealant without making a mess?
Start with a clean, dry surface and apply a steady, even bead of sealant using a caulking gun. Avoid overapplying, as less is more. Then, use our Sealant Smoothing Tool to shape the bead for a professional finish without the mess.
Can I use the Sealant Smoothing Tool with any silicone sealant?
Yes. Our Sealant Smoothing Tool is compatible with all types of silicone sealant. It’s designed for versatility and long-term use.
How do I clean the Sealant Smoothing Tool after use?
Wipe off any excess sealant with a dry cloth immediately after use. For tougher clean-up, you can also use rubbing alcohol. Keeping the tool clean helps preserve its performance and longevity.
Do I really need a smoothing tool? Can’t I use my finger?
While you can use a wet gloved finger to smooth sealant, a dedicated smoothing tool ensures a more precise and hygienic result. It also helps you shape a consistent bead every time, reducing the risks of gaps or uneven edges.
Perfecting your sealant application takes practice, but you can quickly get pro-level results with the proper sealing techniques, quality materials, and a reliable smoothing tool. Whether revamping your bathroom or refreshing your kitchen, a clean seal adds the finishing touch and protects your hard work for years.
To find the perfect product for your project, visit a store near you in the U.S. or Canada.

