

Note: This DIY article is provided as a general guide only and is not intended to take the place of product-specific installation procedures; always follow applicable manufacturers’ instructions. Depending on your home’s age and condition, location within the home, and other potential factors, repairs and/or upgrades or other services may be necessary prior to the beginning and/or completion of your project that may involve the services of a home improvement professional. This article does not include advice pertaining to local building codes and/or any related inspections.
Black spots and mildew stains at a tub seam or sink edge usually mean moisture and residue are lingering where your wipe-down can’t reach. This guide helps you decide on whether to clean or replace the caulk, then reseal with silicone sealant in a smooth profile that sheds water and is easier to clean.
Why seams turn black again, starting at the corners
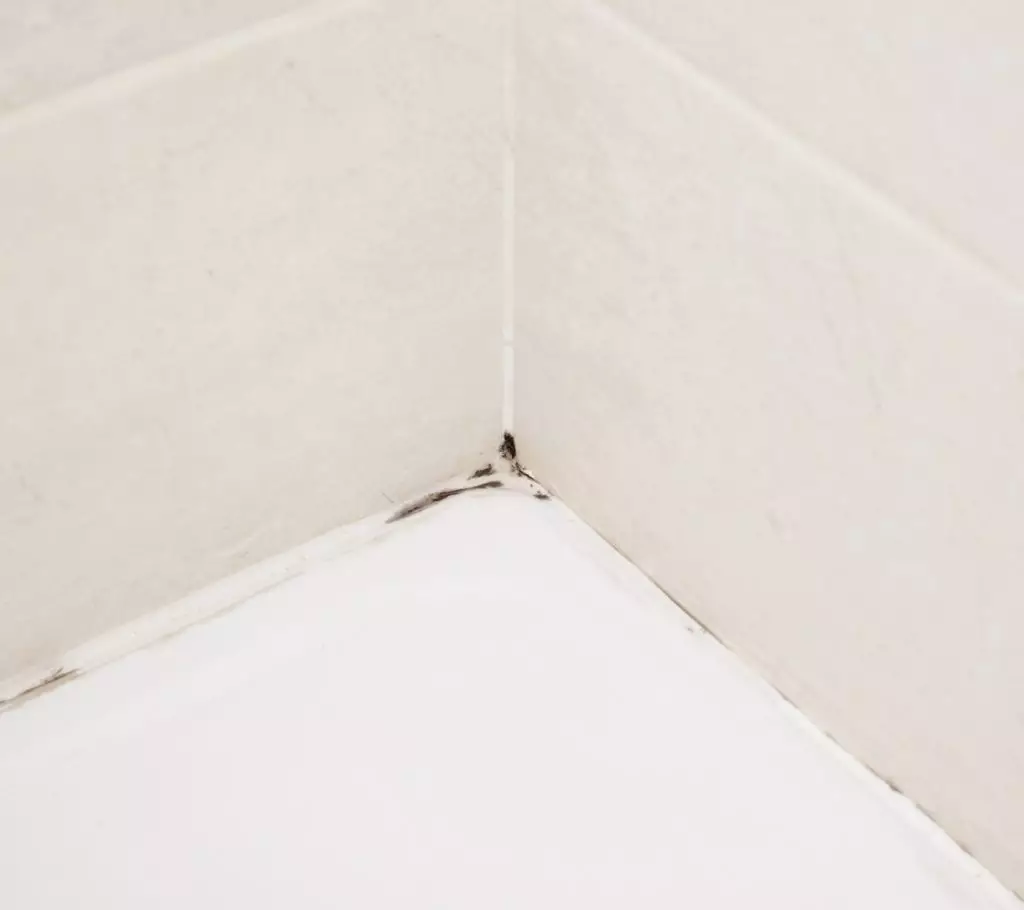
You scrub the seam clean, then the dark mildew spots show up again. In many homes, the cause is wet time. A seam usually stays damp longer than a flat tile or countertop, and that gives residue time to take hold.
In your bathroom, soap scum and skin oils leave a film that traps moisture and feeds mildew. In the kitchen, cooking grease and dust settle into a sticky line near sinks and backsplashes, then splashes deepen the grime.
Corners and transitions dry last because water collects there, and there isn’t a lot of airflow. Mold-resistant caulk helps, but an effective bathroom mildew prevention strategy still depends on keeping that surface film from building up.
Mold-resistant caulk vs. silicone sealant: pick by location and finish
Mold-resistant caulk is a label you will see on many sealant tubes. It usually means it can slow growth on the bead, but the result you get depends on where you use it and how clean the surface stays.
For joints in your home that often see water, GE silicone sealant is built to stay flexible and waterproof. Note that 100% silicone is not paintable, so choose a paintable hybrid, like GE Pro Seal Max Kitchen & Bath, when the seam needs paint.
Start with the location:
- Tubs and showers: choose a silicone-first approach.
- Sink rims and backsplashes: decide based on paint plans and the material finish.
Clean it or replace it: a 2-minute check before you recaulk
Clean it when the bead stays bonded and the line stays intact. In this case, the discoloration should wipe off the surface, and the bead should feel firm.
Conversely, replace the bead if you look closely and see lifting edges, gaps at the tub or tile, corner cracks, soft spots, or black mildew stains under the seal.
If you remove the mildew and the spots return not long after, there’s a good chance moisture has found its way under the bead.
How to remove mold and reseal without creating a grime ledge
If you find that the bead is failing, start fresh for a strong bond.
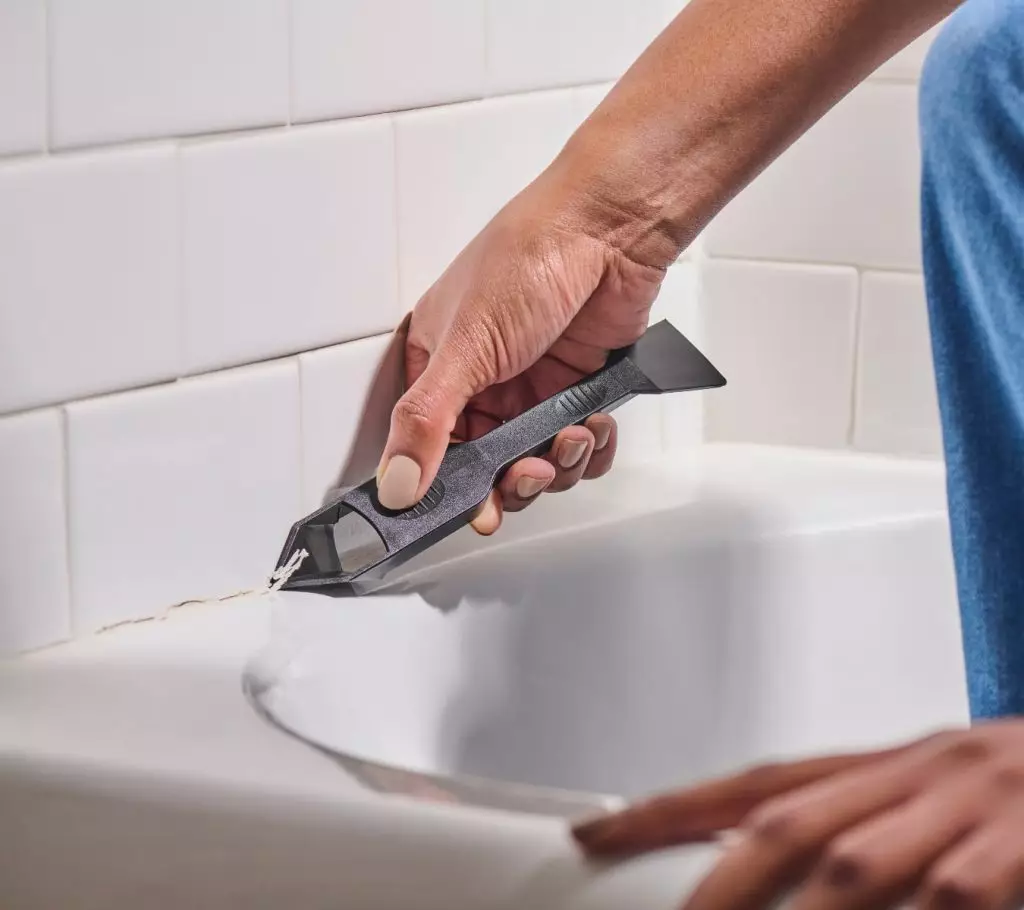
Step 1: Remove the failing bead completely
New sealant often fails to bond to old silicone. Instead, use a caulk removal tool and place it under the bead and lift it in strips to avoid scratching the surrounding surfaces. The GE Sealant Remover Tool helps you cut and lift with more control in tight corners.
For more on how to remove a failed bead, see our guide on how to remove silicone sealant the right way.
Step 2: Prep the joint for adhesion
Remove mold and scrub off surface film, then rinse well. Don’t use detergent or soap if it leaves residue. Silicone can have trouble bonding when soap scum stays behind.
Before moving to step 3, let the joint dry fully.
Step 3: Apply silicone sealant bead
Cut the nozzle to match the joint width, then run one steady pass. Apply the silicone sealant in a continuous line, then tool it right away into a smooth profile.
The GE Cartridge Opener & Smoothing Tool helps you open the cartridge cleanly and shape the bead. Aim for a slightly concave bead that helps water run off instead of pooling on the edge.
Follow the label for water-ready and cure timing.
Choose a silicone sealant that matches your job
Choose based on three factors: water exposure, joint movement, and whether the bead needs paint. Use this quick picker:
- Standard wet-area sealing, no paint plan: GE Advanced Silicone Kitchen & Bath Sealant. It’s 100% waterproof, water-ready in as little as 30 minutes, and comes with 10-year mold-free product protection. Meets ASTM C920 Class 35.
- More movement at the joint, still no paint plan: GE Supreme Silicone Kitchen & Bath Sealant. It’s also 100% waterproof, water-ready in as little as 30 minutes, and designed with lifetime mold-free product protection. Meets ASTM C920 Class 50 and is rated for 50% joint movement.
GE Advanced Silicone Kitchen & Bath is a strong all-around pick. Supreme Silicone Kitchen & Bath Sealant is the step-up when your seam flexes more. The higher-class rating (class 35 vs. 50) tells you the latter has more movement capability before the bead gets stressed.
- You need paintability with wet-area performance: GE Pro Seal Max Kitchen & Bath Sealant. This SMP hybrid sealant is paintable, immediately water-ready, and paint-ready in 60 minutes. It can also adhere to damp or dry surfaces and resists mold and mildew growth.
- Small touch-up without a caulk gun: GE Interior Seal Silicone Sealant. It comes in a squeeze tube and can be exposed to water within 30 minutes. Interior Seal Silicone Sealant also meets ASTM C920 Class 50 and has mold-free product protection.
For bathroom mildew prevention, go with a 100% silicone sealant when the bead will not be painted. If you need a mold-resistant caulk that you can paint, use a paintable hybrid.
Bathroom mildew prevention and kitchen grime control
You do not need a heavy cleaning routine to protect a fresh bead. However, you need to shorten the wet time and remove the film that feeds staining.
After a shower or bath, run the bathroom exhaust fan if you have one, then pull water off the seam with a quick wipe or squeegee. If there is no fan, open the windows or keep the door open until the room dries.
In the kitchen, wipe the sink rim and backsplash seam after dishes. Grease and detergent mist can settle into a sticky line that turns dark over time.
Once a week, clean the seam with a non-abrasive cleaner and a soft cloth. Focus on removing film, not scrubbing the sealant.
Once a month, scan corners and the sink edge for early lift or pinholes. A small fix now beats another full removal later.
When sealing is not the fix, check this first
Sealant helps at the seam. But it will not solve a leak or spot that stays wet behind the bead line. If the bead keeps turning dark under the edge, or it fails again soon after you reseal, you need to look for the source.
Start with the obvious leak points near the seam, like a loose faucet base or shower trim. Then check the surface right around the joint for a grout gap or a low spot where water sits. Fix that path first, then reseal after the area stays dry.
FAQs on mold, mildew, and silicone sealant
Why does mold come back after cleaning?
Because moisture and residue film rebuild at the seam after the surface looks clean. Corners usually show it first since they dry last.
Should I remove and replace the caulk or just clean it?
Clean it if the bead stays bonded and feels firm, and the discoloration wipes off. Replace it if an edge is lifting or the staining sits under the bead.
What’s the difference between mold-resistant caulk and silicone sealant?
“Mold-resistant” is a feature claim on the sealant tube that can apply to different products, including silicone. Silicone sealant is a material choice for wet areas where flexibility matters.
How long should bathroom or kitchen sealant last?
In many homes, a properly applied bead can last for years. Early failure often points to moisture getting under an edge or a seam that moves more than the bead can handle.
A smooth bead that bonds well and stays easy to wipe helps seams look cleaner between cleanings. Ready to reseal? Find GE sealants at a retailer near you in the U.S. or Canada.


