

Note: This DIY article is provided as a general guide only and is not intended to take the place of product-specific installation procedures; always follow applicable manufacturers’ instructions. Depending on your home’s age and condition, location within the home, and other potential factors, repairs and/or upgrades or other services may be necessary prior to the beginning and/or completion of your project that may involve the services of a home improvement professional. This article does not include advice pertaining to local building codes and/or any related inspections.
When gaps around trim, molding, and other transitions are poorly or insufficiently caulked, even fresh, color-matched paint work can look unfinished. Mastering caulking while painting starts with knowing which joints should be filled, which products belongs where, and whether to caulk before painting or after. This guide explains when to caulk before or after painting and shares a few practical techniques to help DIY finishes look cleaner.
Paint should not go over standard silicone sealant, as 100% silicone does not take paint well. Typically, this will change your approach to joint-sealing in particular parts of bathrooms, kitchens, and other wet zones.
Caulk before or after painting?
In most cases, you’ll want to caulk before painting. The usual order is to fill the gaps first, let the bead dry, and then paint as the finishing step. This sequence gives you a smoother transition at trim, molding, and other interior joints that would otherwise stand out after the paint goes on. It also helps the finished surface look more continuous instead of making the caulk line feel like an afterthought.
The main exception to this rule is when joints require a 100% silicone, non-paintable sealant. In these situations, the better approach is often to use a color-matched or clear product first rather than painting over it later.
Caulk vs. sealant: know which belongs in joints
Before you decide whether to paint, start by deciding what the joint in question actually needs. Paintable caulk is usually the better choice for interior trim, molding, baseboards, and other cosmetic gaps where the finished surface needs to blend into the surrounding paint.
In areas where water resistance, flexibility, or movement will be bigger concerns, such as exterior transitions, sealant is the better choice. Some hybrid products can meet both needs simultaneously, which is useful when you want both paintability and stronger moisture protection than standard caulks can provide. The main goal, in any case, is to match the product to the conditions instead of assuming every gap should be handled the same way.
Places DIYers usually caulk before painting
For most DIYers, caulking before painting typically happens in the places where finished surfaces meet and small gaps are easy to notice. Common examples include:
- Interior trim
- Baseboards
- Crown molding
- Door casings
- Wall cracks
Window casings on paintable interior surfaces also fall into this category when the goal is to make the trim look more finished and consistent with the wall. In these areas, caulk is usually part of the prep work rather than a separate repair. Filling the gaps first lends to a more complete appearance once the final coat goes on.
When you should not paint over sealant
Paint should not go over standard silicone sealant as 100% silicone does not take paint well. Typically, this will change your approach to joint-sealing in particular parts of bathrooms, kitchens, and other wet zones. Instead of planning to paint over the bead, you’ll want to choose a color-matched or clear sealant that works visually on its own. This approach usually gives you a cleaner result than trying to force paint onto the wrong product and ending up with peeling, cracking, or an uneven finish. When the joint needs moisture protection first, the finish strategy should follow that requirement.
Step-by-step: how to caulk for a cleaner painted finish
Follow these steps to apply paintable caulk:
-
Remove failed material if needed
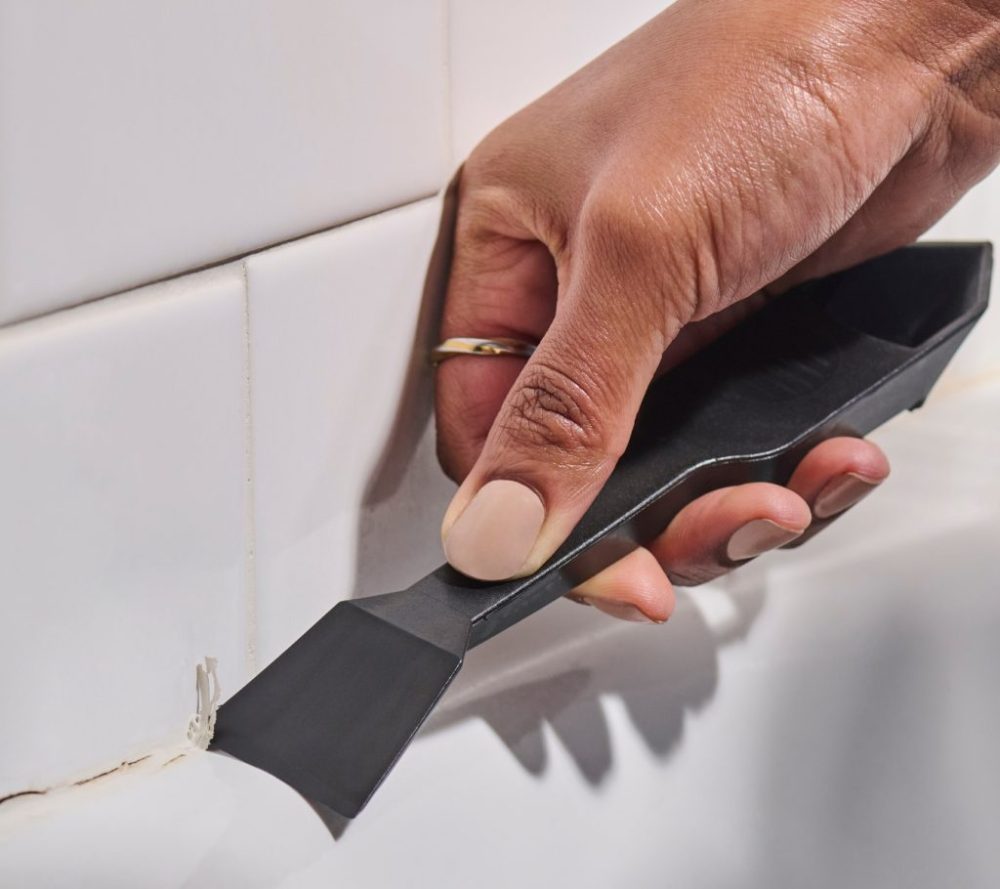
A homeowner removes old sealant with GE’s Sealant Remover Tool. If the joint has already been caulked before, strip out the loose or deteriorated material first with GE’s Sealant Remover Tool or a putty knife.
-
Clean and dry the surface
Paintable caulk will not bond well over dust, grease, loose paint, or leftover residue, so clean the area thoroughly and let it dry fully.
-
Cut the nozzle to match the joint
A smaller opening usually gives you better control and helps keep the line narrow and consistent.
-
Apply an even bead
Run the bead from one end of the joint to the other with steady pressure so the line stays continuous.
-
Smooth the line lightly
Use GE’s Sealant Smoothing Tool or a gloved finger to shape the line and press it into the joint without smearing excess product onto the surrounding surface.
-
Let it dry fully before painting
Once the bead looks clean, stop handling it and give it time to dry completely. Painting too early can disrupt the finish and make the result look rough instead of seamless.

Common mistakes in caulking when painting
A few easy-to-make mistakes can undo an otherwise solid paint-prep job. One of the most common is painting before the bead is fully dry, which can leave the surface rough or disrupt the line. Another is using a non-paintable sealant where a paintable product is needed for the desired finish.
You can also run into trouble when caulking over dust, grease, or loose paint instead of starting with a clean surface. Applying too much product creates its own problems by making the line harder to control and harder to blend visually.
The right GE products for the job

For paintable trim-adjacent joints and window or door projects that still need waterproof performance, GE Pro Seal Max Window & Door is the stronger fit. It works well where the finished surface may be painted but the joint still needs more durability than standard caulk can provide.
For paintable interior joints in moisture-prone spaces, GE Pro Seal Max Kitchen & Bath is the better choice. It gives you paintability with moisture resistance in places where ordinary caulk may not hold up as well over time.
To get GE Sealants’ products for your home improvement project, visit these fine retailers in the U.S. or Canada.


