Note: This DIY article is provided as a general guide only and is not intended to take the place of product-specific installation procedures; always follow applicable manufacturers’ instructions. Depending on your home’s age and condition, location within the home, and other potential factors, repairs and/or upgrades or other services may be necessary prior to the beginning and/or completion of your project that may involve the services of a home improvement professional. This article does not include advice pertaining to local building codes and/or any related inspections.
Winter heating bills often rise because of hidden air leaks that most homeowners never notice. While windows and doors get plenty of attention, small gaps around baseboards, attic hatches, outlets, and foundation joints can waste just as much energy. Finding and sealing these unseen energy leaks is a simple weekend project that can make your home warmer and your heating bills noticeably lower.
Before reaching for a tube of sealant, it helps to know exactly where air is escaping. A quick way to spot leaks is to walk through your home on a windy day and feel along the edges of trim, outlets, and attic hatches for cool air.
Why small energy leaks have a big impact
Tiny air leaks may not seem like much, but they can add up to major energy loss throughout your home over the course of the winter season. When warm air escapes and cold air seeps in through small gaps, your heating system must work harder to maintain a comfortable temperature. That constant cycling increases energy use, shortens the life of your HVAC system, and drives up utility bills. Even a few unsealed cracks around trim, outlets, or attic openings can equal the same energy loss as leaving a small window open all winter.
Beyond comfort, energy leaks at home also affect the humidity balance. Escaping warm air carries moisture, which can condense inside walls or attics and contribute to mold or rot over time. By sealing these gaps, you keep conditioned air where it belongs and prevent costly long-term damage. The good news is that most of these leaks are easy to locate and seal with a few affordable materials.
How to check for leaks before sealing

Before reaching for a tube of sealant, it helps to know exactly where air is escaping. A quick way to spot leaks is to walk through your home on a windy day and feel along the edges of trim, outlets, and attic hatches for cool air. You can also use an incense stick or a thin strip of tissue. If the smoke or paper moves, there’s air movement. At night, shining a flashlight from one side of a suspected gap while someone looks from the other side can reveal cracks that aren’t visible in daylight.
For a more thorough inspection, focus on areas where different materials meet, like wood against concrete or drywall near vents. Make a simple checklist as you go, marking each spot that needs sealing. Identifying these problem areas first helps you use the right sealant where it’s most effective, saving both time and materials during your project.
How to identify energy leaks: baseboards and trim

Baseboards and trim often conceal small gaps through which warm air escapes and cold air enters, especially in older homes. These gaps usually form as building materials expand and contract with changes in temperature and humidity or as the house settles over time. The result is a nearly invisible draft that can make rooms feel cooler and force your heating system to work harder.
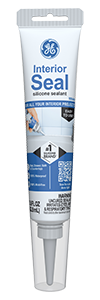
To fix the problem, clean along the baseboard and where trim meets the wall or floor, then apply a thin bead of GE Interior Seal Silicone Sealant, a flexible, 100% silicone sealant formulated for indoor use. It adheres strongly to most common materials and remains permanently flexible to block air movement while resisting mold and mildew. Once cured, it creates a long-lasting, airtight seal that blends neatly with surrounding surfaces. For easy and neat application, you can use GE’s Sealant Smoothing Tool.
Overlooked draft zones: attic hatches and ceiling penetrations
Attic hatches, recessed lighting, and ceiling vents are often-overlooked culprits when it comes to home energy loss. Warm air naturally rises, and if these areas aren’t properly sealed, it can escape directly into unheated attic spaces. This both wastes energy and creates condensation that damages insulation and framing over time. To check for leaks, look for visible gaps around hatch trim, vent housings, or drywall seams, and feel for drafts on a cold day.
Before sealing, clean the surfaces around each opening to remove dust or insulation debris. Then apply a bead of GE Supreme Silicone Window & Door Sealant. This 100% silicone formula remains permanently flexible and airtight even as temperatures fluctuate. It bonds securely to wood, drywall, and metal, leaving a long-lasting seal resistant to cracking and shrinking. For additional insulation, you can also install weatherstripping around the hatch or use foam gaskets on light fixtures. Combined, these small fixes can significantly improve energy efficiency and comfort throughout the home.
Electrical outlets and switch plates
Air often seeps through the gaps around outlet boxes, especially those installed on exterior walls. You might feel a slight draft when standing nearby on a cold day, a clear sign that warm air is escaping into wall cavities.
Start by turning off the power to the outlet at the breaker, then remove the cover plate. Insert a foam gasket behind the plate to block airflow through the opening. Next, run a thin bead of GE Interior Seal around the edges where the electrical box meets the drywall. Replace the cover plate once the sealant has cured.
Sill plates and foundation joints
Sill plates and foundation joints sit where your home’s wooden frame meets the concrete foundation, creating natural gaps that expand and contract with seasonal temperature shifts. Because they’re often located in basements or crawl spaces, air movement here often goes unnoticed while still affecting your home’s comfort and efficiency.
To locate leaks, inspect along the top edge of the foundation where the framing begins. If you feel a draft or notice gaps where wood meets concrete or masonry, it’s time to seal. Clean the area to remove dust and debris, then apply GE Supreme Silicone Window & Door Sealant. In addition to helping your home retain heat, sealing sill plates also prevents moisture intrusion and pest entry, making it one of the most effective winter prep tasks homeowners can tackle.
To get GE Sealants’ products for your home improvement project, visit these fine retailers in the U.S. or Canada.


