Note: This DIY article is provided as a general guide only and is not intended to take the place of product-specific installation procedures; always follow applicable manufacturers’ instructions. Depending on your home’s age and condition, location within the home, and other potential factors, repairs and/or upgrades or other services may be necessary prior to the beginning and/or completion of your project that may involve the services of a home improvement professional. This article does not include advice pertaining to local building codes and/or any related inspections.
Sealing small cracks along baseboards, trim, and crown molding is a quick way to refresh a room, but it can quickly turn messy. With the right prep, product, and application technique, you can achieve crisp, paint‑ready lines that last.
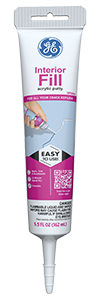
Interior Fill Acrylic Putty sands smooth and is paint‑ready in as little as 15 minutes. Perfect for clean, quick trim touch-ups.
Why sealing gaps and cracks matters
Even the smallest gap along baseboards, crown molding, or trim can undermine the look of a room. These openings leak air, collect dust, and give pests a path inside. In certain light, they cast shadow lines that make walls and ceilings look uneven. Left open, seasonal expansion and contraction widen cracks and force a larger repair.
Sealing gaps and cracks now stops these issues before they start and keeps joints tight, surfaces clean, and edges sharp so your trim looks seamless and your paint finish stays flawless.
Choosing the right low‑odor product for your project
The right sealant will give you a clean bead now and a joint that stays sealed through every season. Indoors, you need a low-odor product so you can work comfortably without strong fumes, even in occupied rooms.
For paintable, static joints, use GE Interior Fill Acrylic Putty:
- Low-odor, water-based formula safe for indoor use
- Sands smoothly and is paint-ready in about 15 minutes
- Best for nail holes, hairline cracks, and non-moving gaps in trim, baseboards, or crown molding
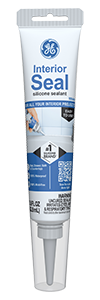
For flexible or moisture-exposed joints, use GE Interior Seal Silicone Sealant:
- 100% waterproof with ±50 percent joint movement capability for seasonal expansion and contraction.
- Neutral-cure, low-odor formula applies comfortably without airing out the house.
- Lifetime mold-free guarantee and stays looking clean in kitchens, baths, and other humid spaces.
If you plan to paint over the joint, go with Interior Fill. If you need movement tolerance or moisture protection, reach for Interior Seal.
Prep before you seal gaps and cracks
A clean, well-prepped joint is the difference between a bead that lasts and one that fails early. Before you start:
- Remove old sealant. Take out any loose or failing bead, clean the joint thoroughly, and make sure it’s completely dry before applying new product.
- Protect nearby surfaces. Lay a drop cloth or kraft paper along the floor and tape it in place.
- Clean the gap. Vacuum out dust and debris, then wipe with a damp cloth and let it dry.
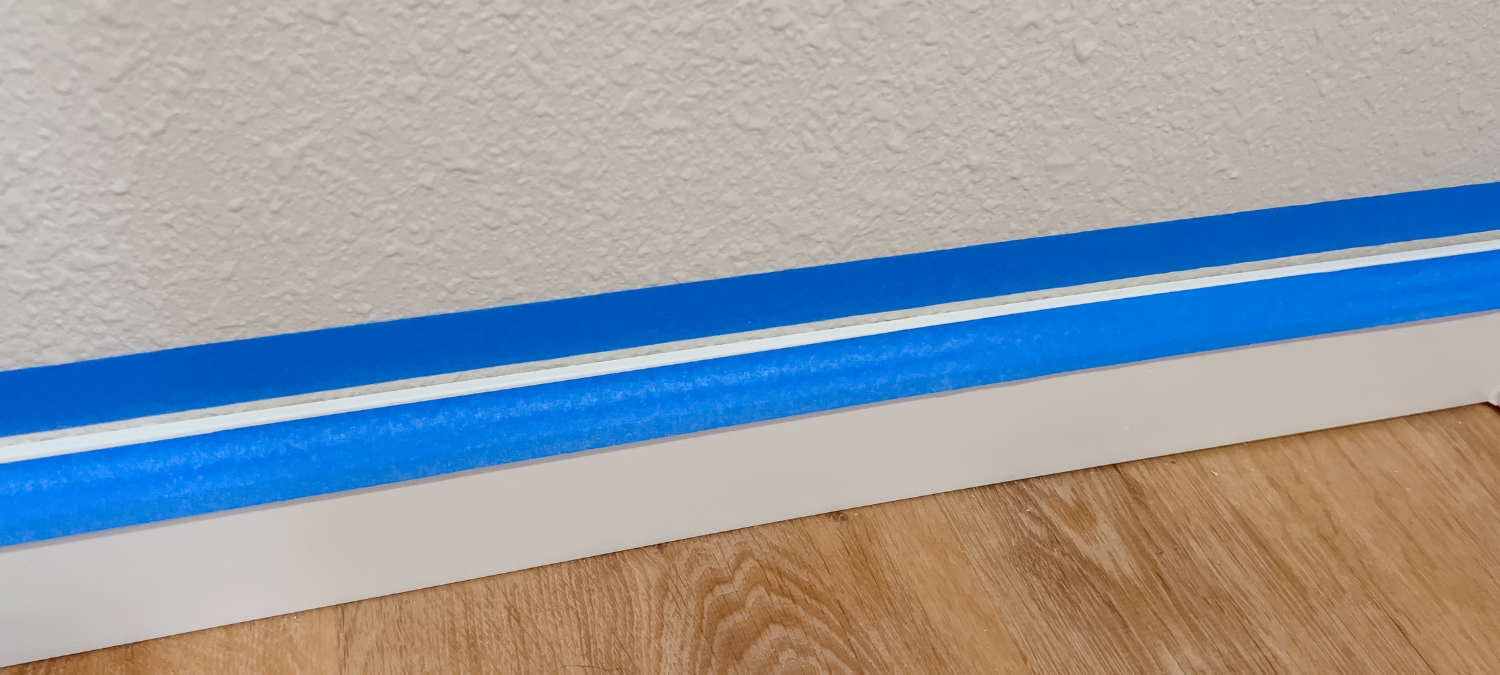
- Mask the edges. Apply masking tape along both sides of the gap for a straight, defined line.
- Control the depth. If the gap is deeper than 1/4 inch, insert a backer rod to support the sealant and prevent overfilling.
Proper prep sets up Interior Fill Acrylic Putty and Interior Seal Silicone Sealant for strong adhesion and a smooth, mess-free finish.
Apply sealant without making a mess
Follow the steps below to keep the sealant exactly where you want it.

- Cut the nozzle to match the gap: Slice the tube tip at a 45-degree angle so the opening equals the gap width. Make it too small, and you’ll drag the bead. Too wide and you’ll likely flood it.
- Prepare the tube:
- Interior Fill Acrylic Putty: Knead the tube gently to soften the material.
- Interior Seal Silicone Sealant: Remove the cap, puncture the seal, and position the tip at your starting point.
- Run a continuous bead: Squeeze with consistent pressure while pulling the tube in one smooth pass. If the gap exceeds the product’s limit (1/8 inch for Interior Fill Acrylic Putty, 3/8 inch for Interior Seal Silicone Sealant), layer the bead or use a backer rod first.
- Tool immediately with the GE Smoothing Tool:
- Interior Fill Acrylic Putty: Press the bead into the joint and shape a flush, paint-ready line.
- Interior Seal Silicone Sealant: Tool within 5–10 minutes to seat the sealant and create a crisp, flexible edge.
- Pull the tape clean: Remove it while the bead is wet so the edge stays razor-straight. Wait too long and you’ll tear the bead.
- Clean as you go:
- Interior Fill Acrylic Putty: Wipe excess with a damp cloth before it skins.
- Interior Seal Silicone Sealant: Remove uncured product from the tool or surfaces with mineral spirits. Water will not work.
Follow this sequence and your bead will stay exactly where you put it with no smears on the hardwood, no haze on the wall, and no redo waiting tomorrow.
Finish sealing cracks and blend the paint
The bead is down, but the job isn’t done. How you handle the next few minutes decides whether the joint blends invisibly or leaves a tell-tale line.
- Interior Fill Acrylic Putty: In shallow applications (1/16 to 1/8 inch), the bead is paint-ready in about 15 minutes. Once dry, feather-sand any high spots, then prime and paint so the repair disappears.
- Interior Seal Silicone Sealant: Let the bead skin for about 30 minutes before touching it. This sealant isn’t paintable, so choose your final color at the start. It’s available in white and clear to match most trim and surface finishes.
- Blend it in. For Interior Fill, match your trim or wall color so the line disappears. For Interior Seal, the cured bead should vanish into the shadow line.
- Protect the edge. Keep dust, fingerprints, and stray paint off the joint until it’s fully cured. One smudge now can undo all the work you just perfected.
FAQ: sealing gaps and cracks indoors
Can I paint over silicone sealant?
No, silicone sealant isn’t paintable. If you need to seal gaps and cracks that you plan to paint, use a paintable acrylic instead.
Why do sealed joints crack in winter?
Seasonal movement causes trim, baseboards, and crown molding to expand and contract. If you’re sealing cracks in areas prone to this movement, choose a flexible sealant like Interior Seal Silicone Sealant.
How do I avoid messy lines when sealing gaps?
Mask both sides of the gap with painter’s tape, run a steady bead, smooth it with the GE Smoothing Tool, and pull the tape while the bead is still wet.
Do I need to remove old sealant before reapplying?
Yes, if the bead is cracked, peeling, or pulling away from the surface, it needs to come out. A fresh seal won’t adhere to failing material, and gaps will reopen sooner.
The gap between a quick fix and a pro-level finish comes down to three things: the right product, the right technique, and the right timing. Use GE Interior Fill Acrylic Putty on paintable joints and GE Interior Seal Silicone Sealant on flexible, moisture-exposed joints to seal gaps and cracks indoors without mess or guesswork.
Find GE products at a retailer near you in the U.S. or Canada.